
Rudwexa AI Visibility
The Complete User Guide — how to make your WordPress site visible to ChatGPT, Claude, Gemini, Perplexity, and every other AI answer engine. Click any item below to open it.
For twenty years, “getting found online” meant ranking on Google. That is changing. When someone asks ChatGPT, Claude, Gemini, or Perplexity a question today, the AI often answers directly — and either mentions your site as the source, or answers without you entirely, using someone else’s content instead.
Rudwexa AI Visibility scores your WordPress site on exactly what these AI systems look for, then fixes the gaps automatically: structured data (schema), FAQ sections, clear headings, image descriptions, and content depth. The goal is simple — the next time someone asks an AI a question your content can answer, the AI actually cites you.
Who this is for
- Bloggers and content sites that want to stay visible as search shifts to AI answers
- Online stores (WooCommerce) that want product pages AI shopping assistants can actually understand
- Agencies managing AI visibility across multiple client sites
Throughout this guide, features marked FREE are available on every install. Features marked PRO require a Pro license.
Step 1 — Install the plugin
- In your WordPress admin, go to Plugins → Add New → Upload Plugin.
- Choose the Rudwexa AI Visibility .zip file and click Install Now.
- Click Activate. A new “Rudwexa AI” menu appears in your left sidebar.
Step 2 — Add an AI provider API key
Scanning and scoring your site works immediately with no setup. But automated fixes that generate new text — schema, FAQs, meta descriptions, expanded content — need an AI provider connected.
- Go to Rudwexa AI → Settings.
- Choose a provider: OpenAI, Claude (Anthropic), or Gemini (Google).
- Paste in your API key for that provider. The page shows you exactly where to get one for whichever provider you pick.
- Click Save Settings.
Step 3 — Run your first scan
- Go to Rudwexa AI → AI Scanner.
- Click Run Full Site Scan.
- Once it finishes, go to Rudwexa AI → Dashboard to see your Overall AI Visibility Score.
Your one-page summary: an Overall AI Visibility Score, a breakdown across SEO, AEO (Answer Engine Optimization), GEO (Generative Engine Optimization), Schema, and more, plus how each individual AI platform sees your site.
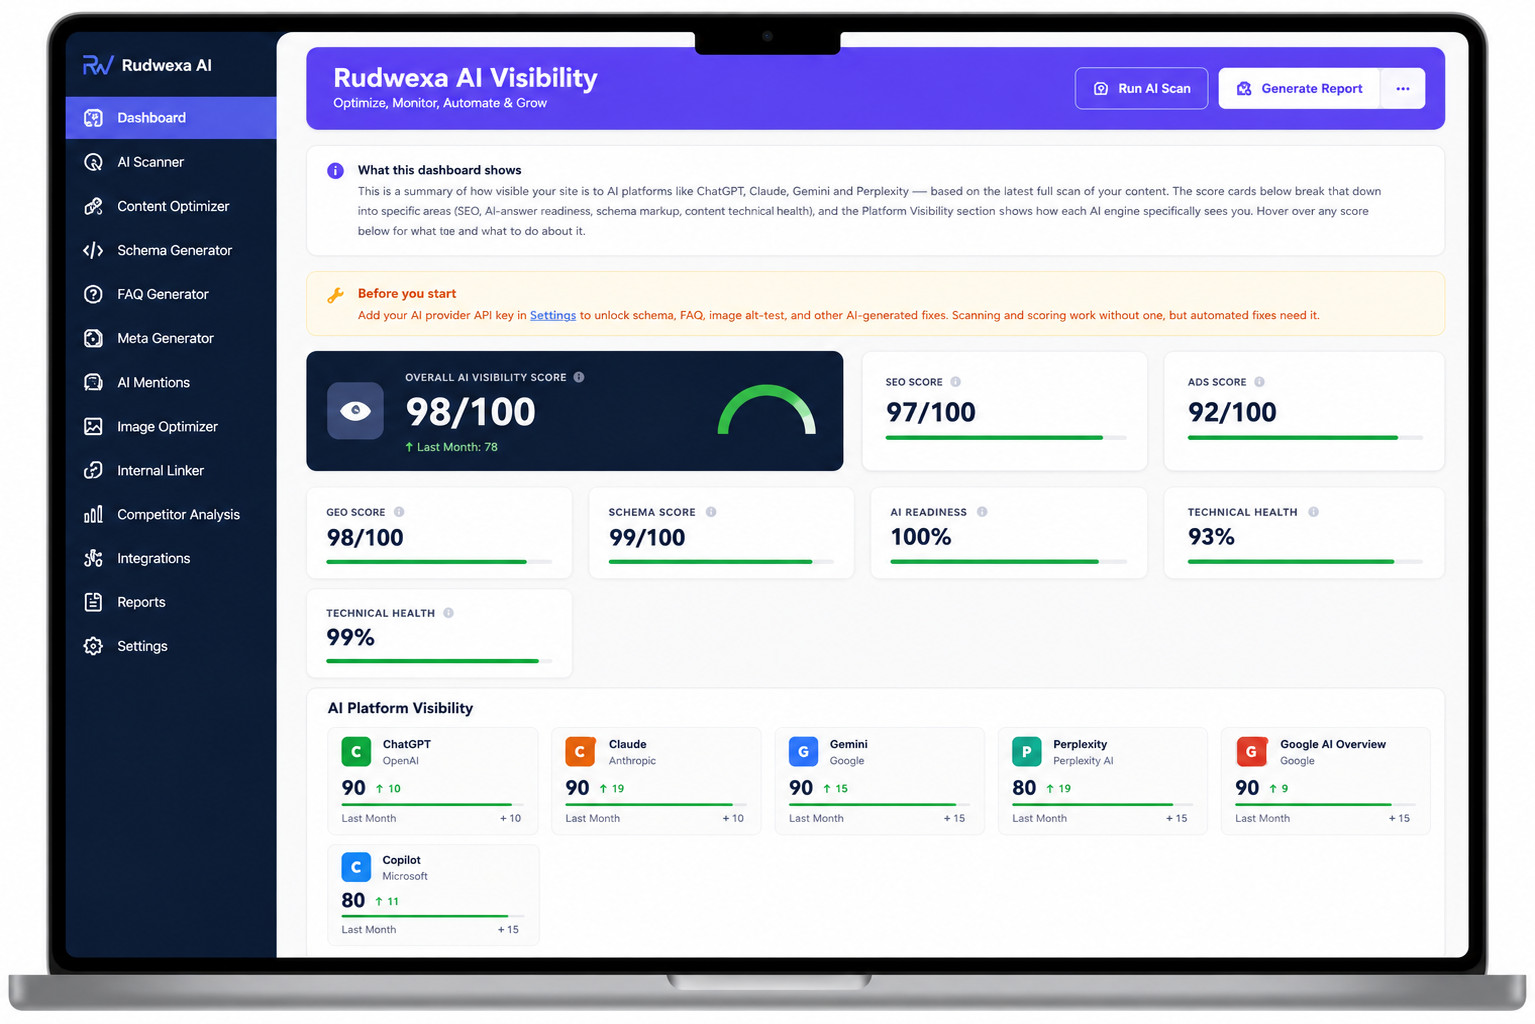
The dashboard after a scan — real scores, platform breakdown, and recent issues.
How to read it
- Overall AI Visibility Score — the single number at the top; hover any score card for what it measures and how to improve it
- AI Platform Visibility — your score broken out separately for ChatGPT, Claude, Gemini, Perplexity, Google AI Overviews, and Copilot
- Scan Overview — how many of your posts have been scanned so far
- Recent Issues — the newest problems found, with a direct link to fix each one
- Quick Actions — one-click shortcuts into the Scanner, Optimizer, Writer, and other tools
Scans every published post and page for the specific things AI answer engines look for — schema markup, clear headings, FAQ sections, meta descriptions, and content depth — and scores each one individually.
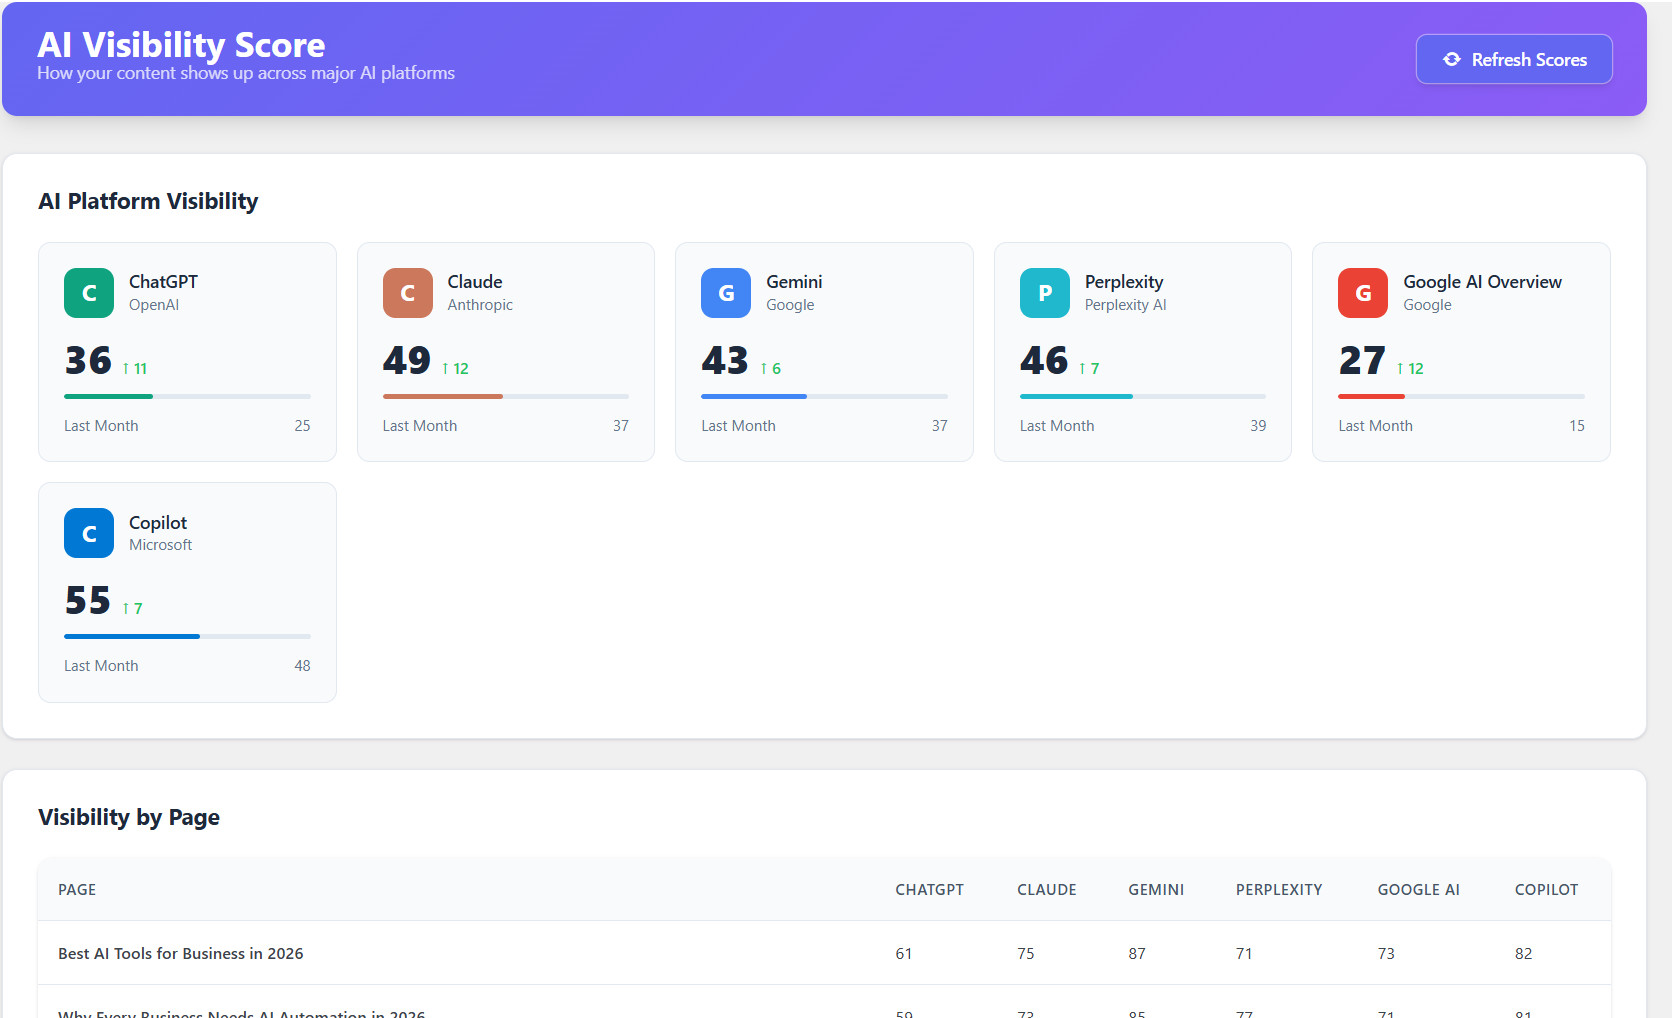
Illustration of the Scanner page layout — per-page scores with one-click fixes.
How to use it
- Go to Rudwexa AI → AI Scanner.
- Click Run Full Site Scan (or scan just the pages that changed since your last scan).
- Each page in the results table shows its SEO, AEO, GEO, and Schema scores — hover any score to see exactly which issue is affecting it.
- Click Fix Automatically next to any page. This generates and saves the missing pieces — schema, FAQs, meta text, expanded content — directly to that page, no writing required.
- The success message shows exactly what was changed, and the page reloads with your updated score.
A closer look at one specific part of your Dashboard: how each individual AI platform — not just an average — currently sees your site, and how that’s trended over the last month.
Per-platform breakdown — this is what genuinely different visibility across AI engines looks like.
Not every AI engine works the same way. A page that ChatGPT cites confidently might be invisible to Perplexity, which weighs freshness and citations differently. Tracking these separately — instead of one blended score — shows you exactly where to focus next.
- Go to Rudwexa AI → AI Visibility Score.
- Click Refresh Scores any time to pull the latest numbers.
- The Visibility by Page table below shows the same breakdown per individual page, not just site-wide.
A focused editor for one page at a time — see every suggestion for that specific page, apply the ones you want, or use Quick Actions to run a full pass in one click.
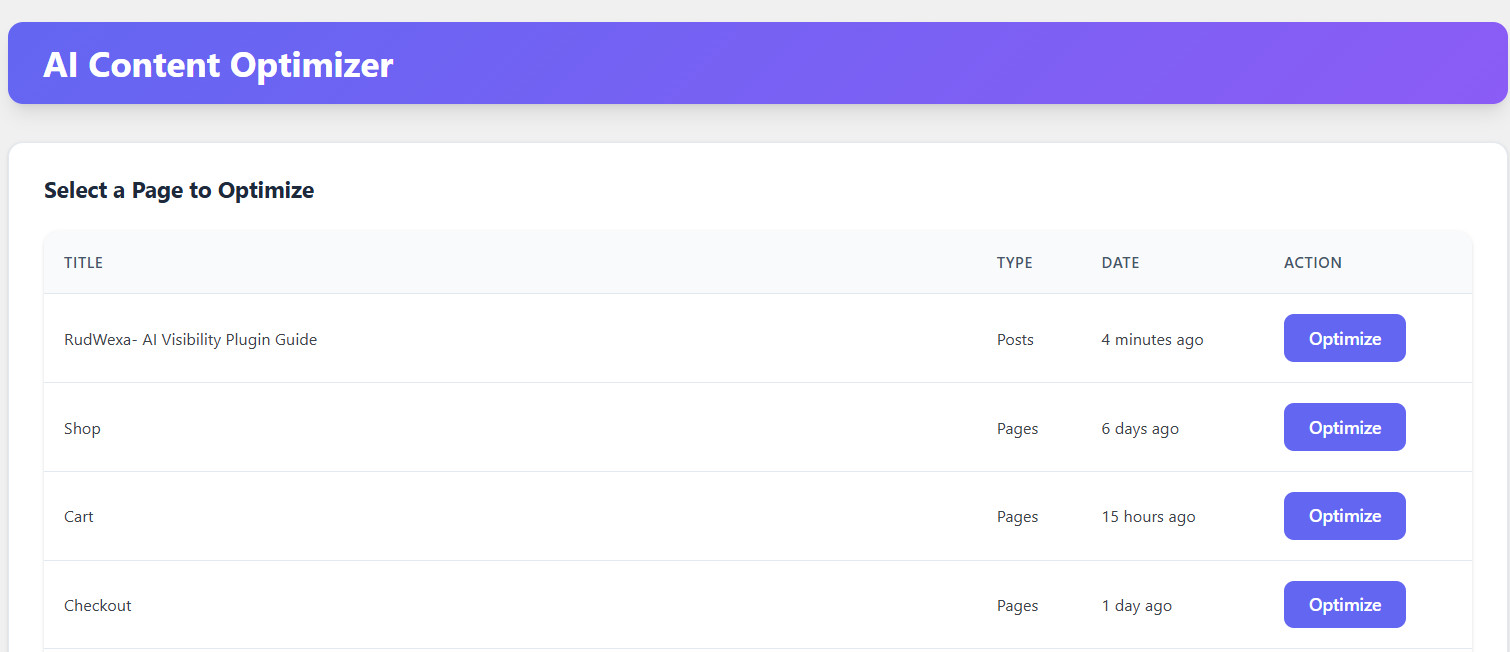
Illustration — suggestions, quick actions, and a manual content editor, all on one page.
- Open Rudwexa AI → Content Optimizer for a specific page (or click through from the Scanner’s results).
- Check the boxes next to the suggestions you want applied, then click Apply Selected Fixes.
- Or use Quick Actions for one-click passes: Full Optimize, Fix Headings, Generate Meta, Generate Schema, Generate FAQ, or AI Summary.
- The “What We Changed” panel shows exactly what was generated for each fix, in plain language.
- You can also edit the page content directly at the bottom and click Save Changes.
Schema markup is structured data that tells AI systems specific facts about your content — not just “there’s a product here,” but its exact price, rating, and availability. This page builds it two ways: automatically with AI, or by hand for full control.
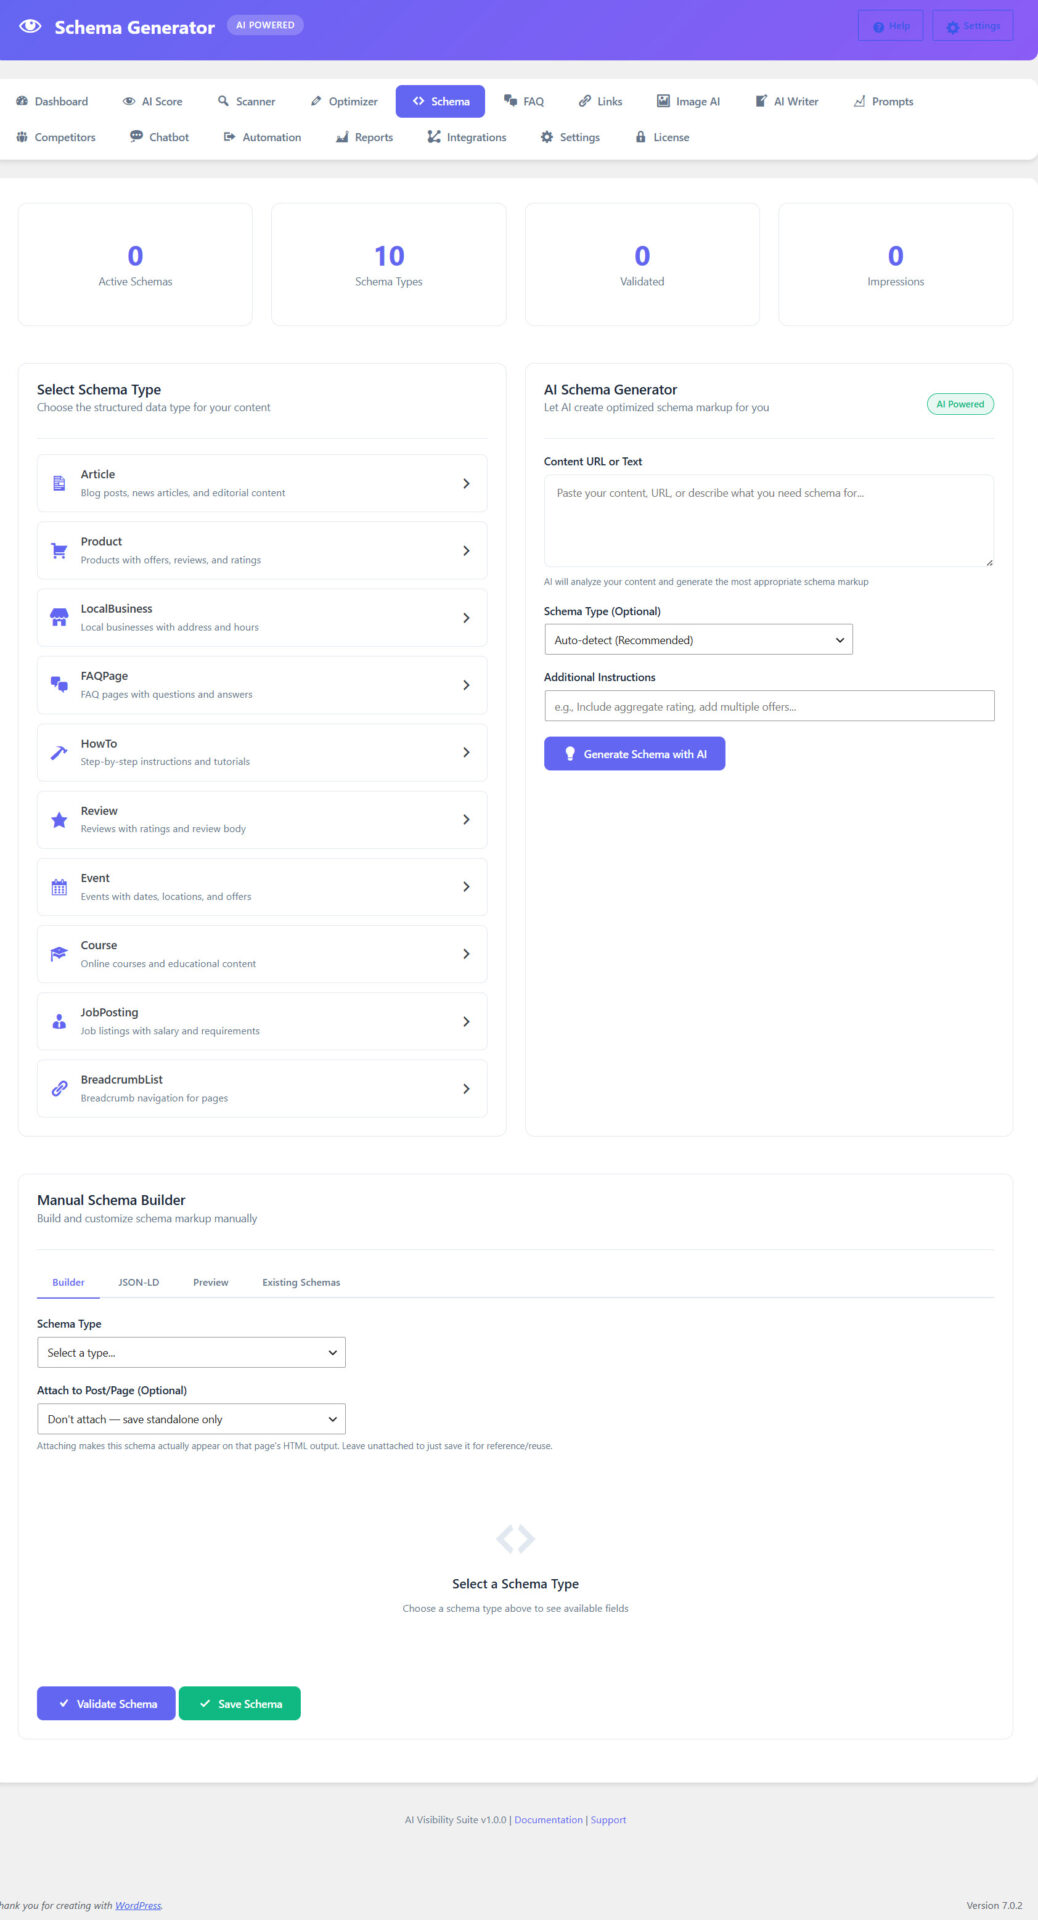
Illustration — type selection, AI generation, and the Manual Schema Builder.
Option A — Generate with AI
- Pick a schema type from the cards at the top (Article, Product, FAQ, Event, Review, HowTo, and more).
- Paste in the content, a URL, or a description of what you need schema for.
- Click Generate Schema.
Option B — Manual Schema Builder
- Go to the Builder tab and choose a schema type.
- Fill in the fields shown — each one has an example right below it so you know the expected format.
- Optionally choose a post, page, or product to attach it to — this makes the schema actually appear in that page’s HTML.
- Click Validate Schema to check your fields are complete, then Save Schema.
Turns any page into a set of natural questions and answers — the exact format AI assistants pull from most often — complete with FAQPage schema attached automatically.
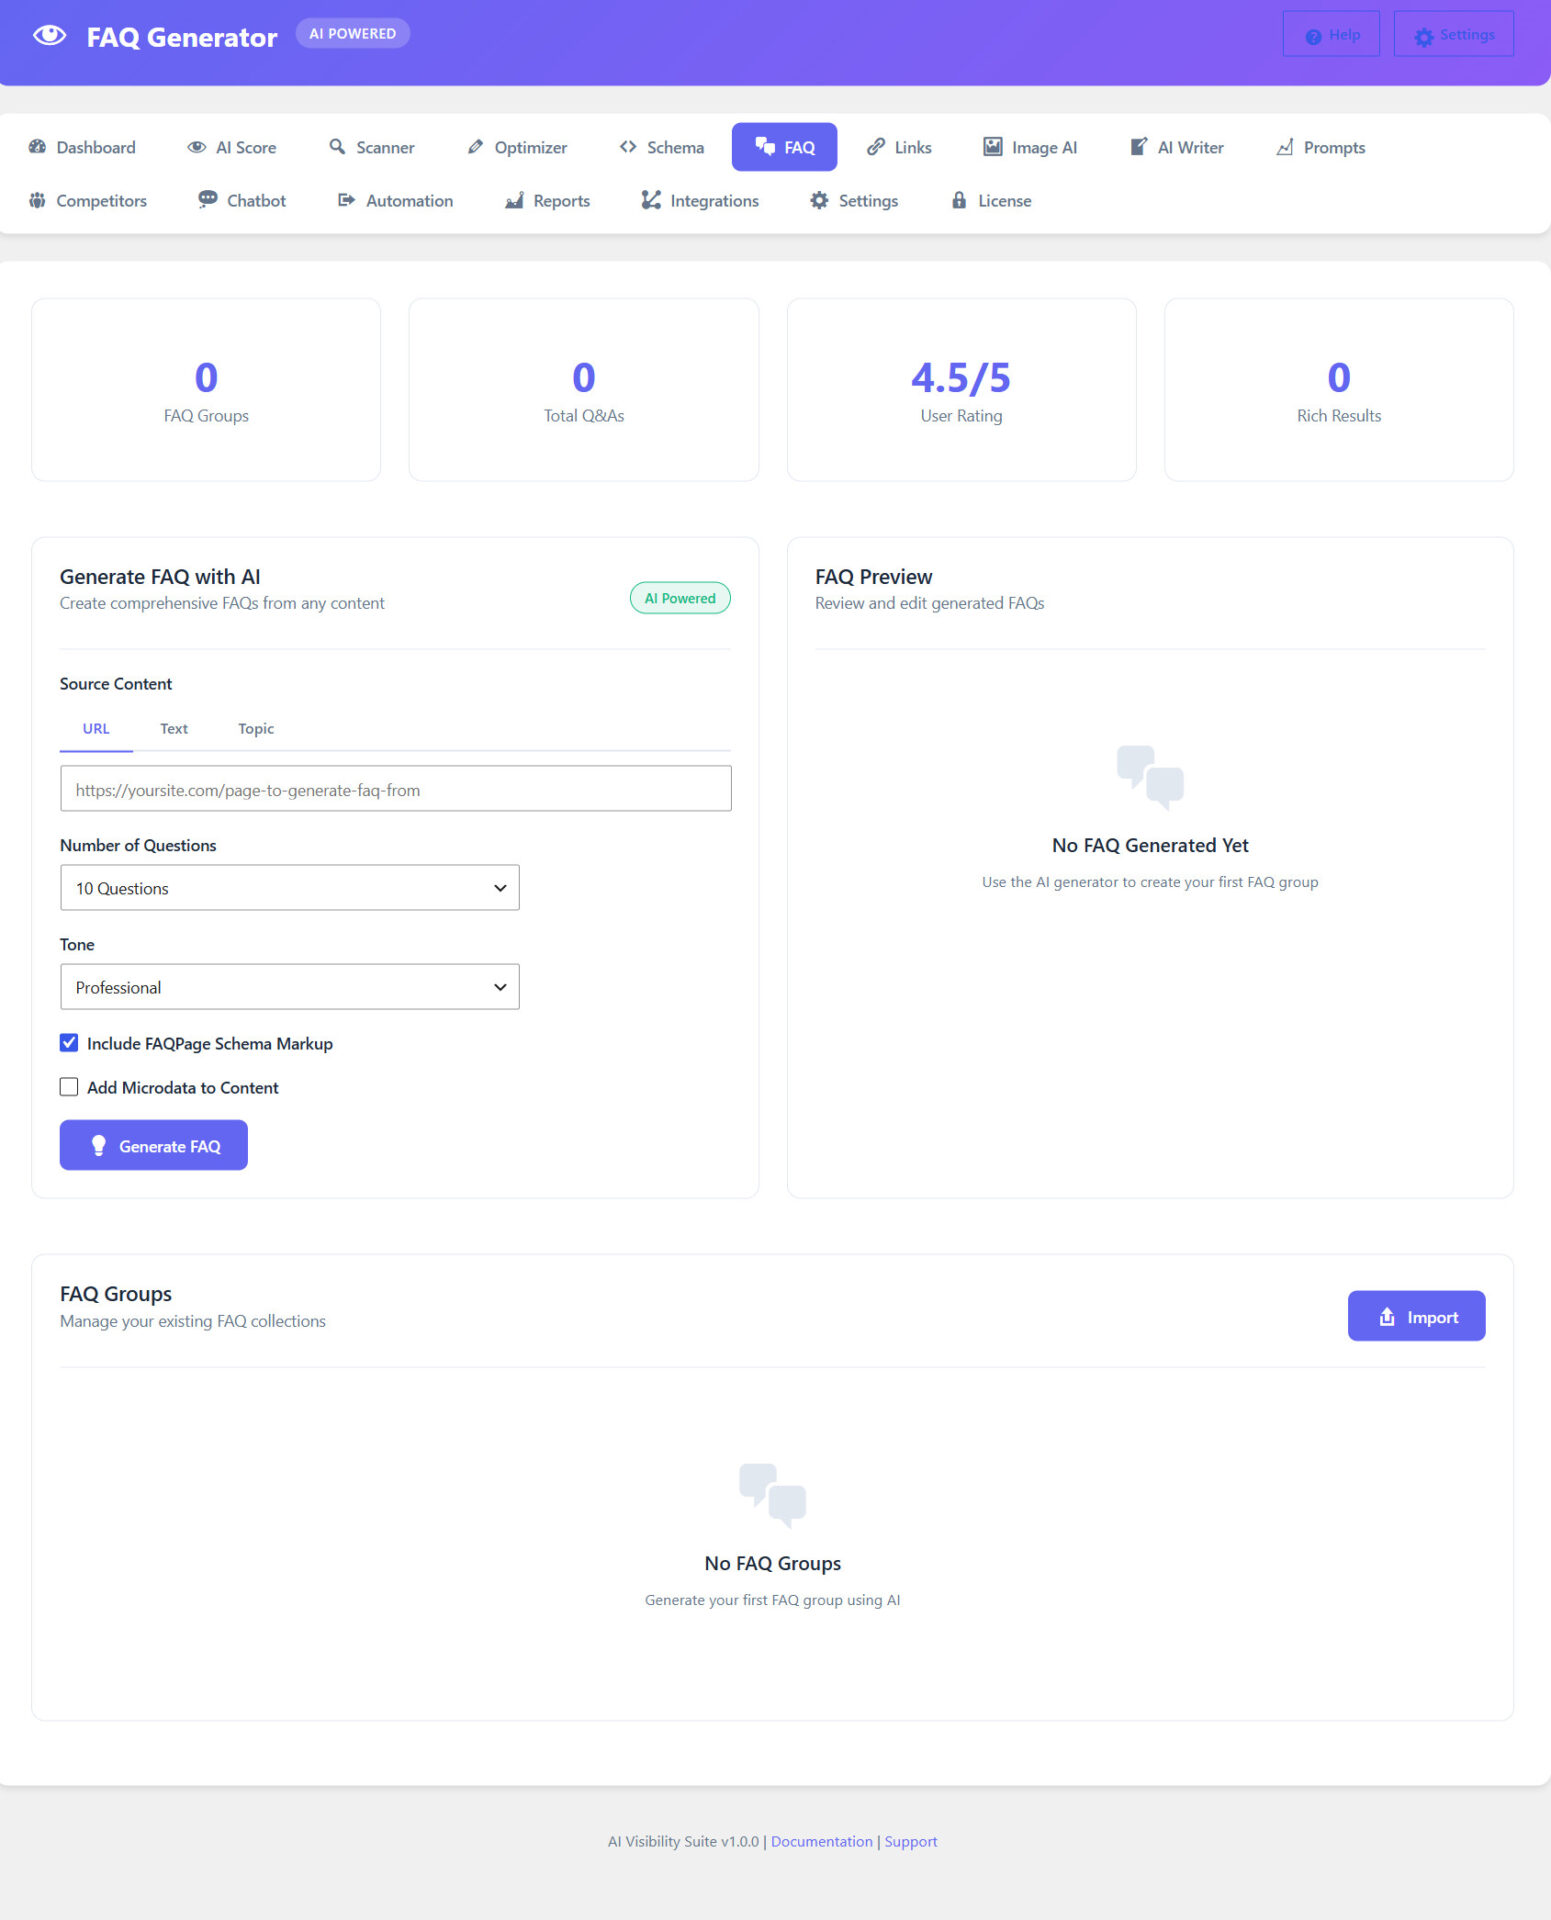
Illustration — generate FAQs for any post, then review and save them.
- Go to Rudwexa AI → FAQ Generator.
- Select the post or page you want FAQs for, and how many questions to generate.
- Click Generate FAQs.
- Review the generated questions and answers, edit anything you want to change, then click Save FAQ Group.
- Use the shortcode shown to place the FAQ block anywhere in your content, or let it attach automatically.
Internal Links
Finds pages on your site with no internal links pointing to them (orphaned pages) and suggests exactly where to add a link and what text to use — this is part of what AI crawlers follow to understand your site’s structure.
- Go to Rudwexa AI → Internal Links.
- Review the list of orphaned or under-linked pages.
- Click Suggest Links on any page to see recommended source pages and anchor text.
- Click AI Fix All to apply every suggestion at once, or add links one at a time.
Image AI
Writes descriptive, accurate alt text for your images automatically — helping both accessibility tools and AI crawlers understand what’s actually in them.
- Go to Rudwexa AI → Image AI.
- Select the images you want processed, or choose “all missing alt text.”
- Click Optimize — each image gets a real, specific description, not a generic placeholder.
Give it a topic, and it drafts a full, structured, citation-ready article — headings, FAQ section, and schema markup included — ready to review and publish.
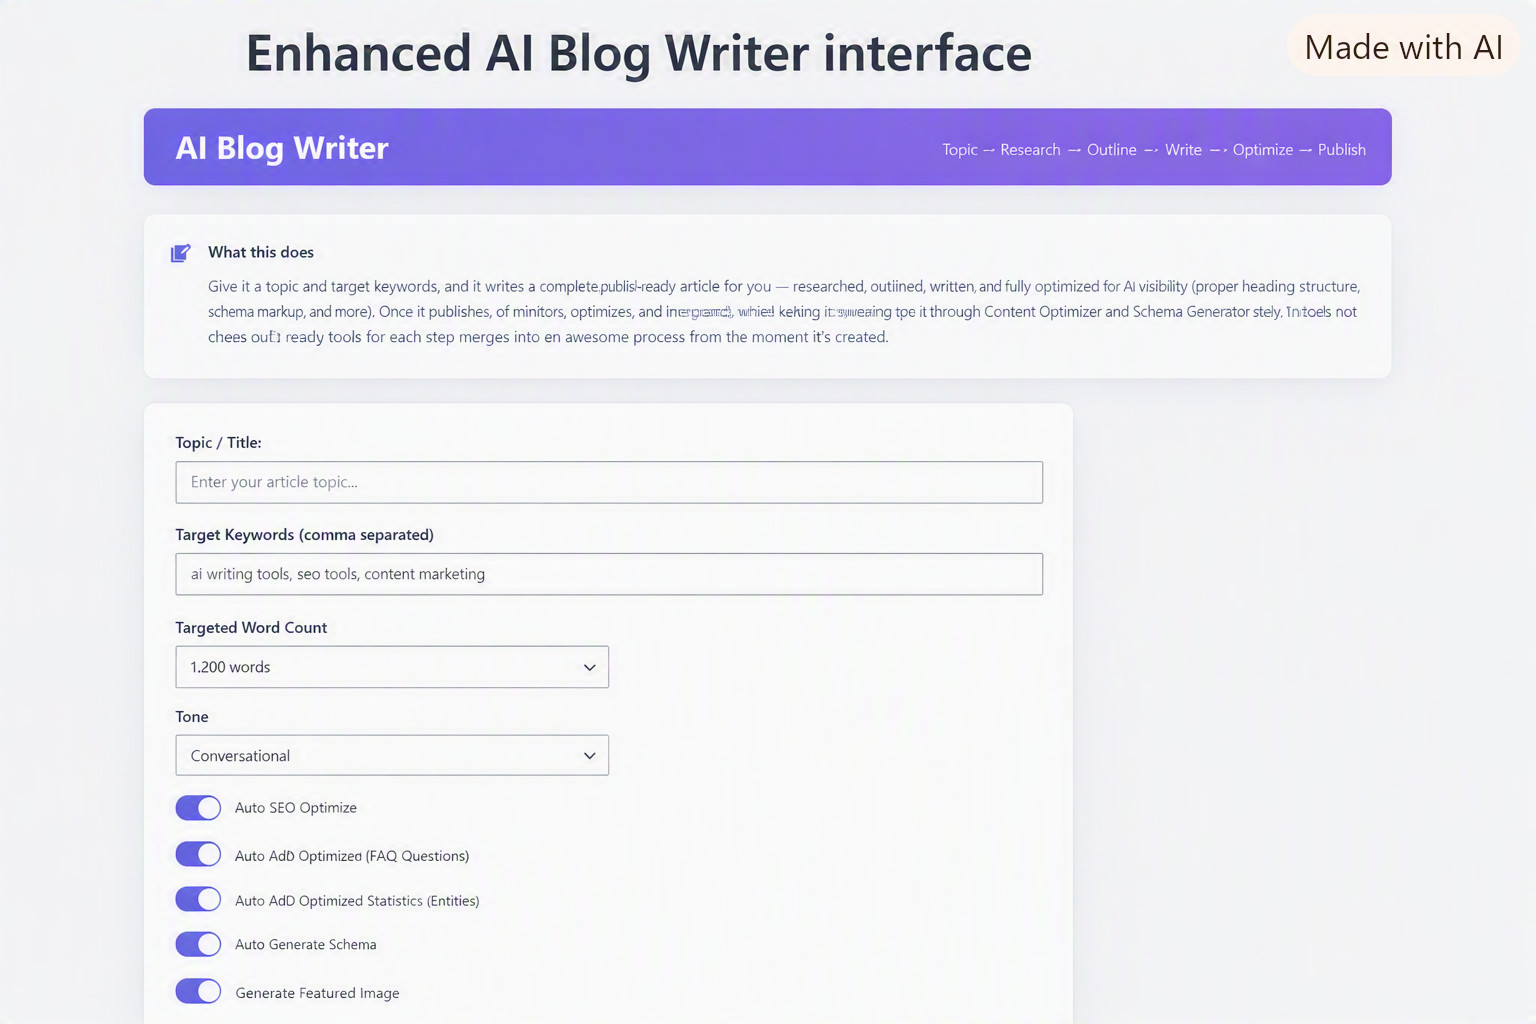
Illustration — set your topic and options on the left, review the draft on the right.
- Go to Rudwexa AI → AI Writer.
- Enter a topic, target keywords, and desired word count.
- Choose which options to include: SEO optimization, AEO, GEO, schema markup, and a featured image.
- Click Generate Article and review the draft that appears.
- Click Publish to make it live, Edit to make changes first, or Regenerate to try again.
Prompt Tracker
Tracks specific questions people actually ask AI assistants in your niche, and checks whether your site gets mentioned in the real answer — the closest thing to seeing your AI visibility in action.
- Go to Rudwexa AI → Prompt Tracker.
- Add a prompt you expect your customers to ask an AI assistant (or pick one of the suggested prompts).
- Click Check Prompt — this sends the real question to your configured AI provider and checks the actual response for a mention of your site.
- Track results over time to see whether your visibility for that topic is improving.
Competitor Analysis
Compares your content, schema coverage, and structure against a competitor’s domain, so you can see specifically where they’re ahead.
- Go to Rudwexa AI → Competitor Analysis.
- Enter a competitor’s domain and click Analyze.
- Review the side-by-side comparison of content score, schema markup, and heading structure.
Adds an on-brand chat assistant to your site that answers visitor questions using your own content — a second, direct channel for the same “give a good answer” goal the rest of the plugin optimizes for.

Illustration — configure your chatbot on the left, preview it live on the right.
- Go to Rudwexa AI → Chatbot Builder.
- Set a name, welcome message, and brand color.
- Use the live preview to see exactly how it will look before publishing.
- Click Save Chatbot — it appears on your site automatically.
Business Automation
Set up workflows that react automatically to events — a new scan completing, a score dropping — and trigger an action like a Slack notification or an automated fix.
- Go to Rudwexa AI → Business Automation.
- Click New Workflow, choose a trigger (like “score drops below 70”) and an action.
- Save the workflow — it runs automatically from then on, and its activity log shows every time it fires.
Reports
Scheduled and exportable summaries of your AI visibility over time — useful for tracking progress or sharing with a client.
- Go to Rudwexa AI → Reports.
- Click Schedule New to set up a recurring report (weekly, monthly), or Generate for a one-off snapshot.
- Once Google Analytics and Search Console are connected under Integrations, reports include real traffic and keyword data alongside your AI visibility scores.
Connects Rudwexa to outside services — Google Analytics and Search Console for real traffic data, Facebook for auto-posting, and Slack, Zapier, and others for automation.
Illustration — each connected service shows its live status, right on the card.
Connecting Google Analytics or Search Console
- Go to Rudwexa AI → Integrations.
- Enter your Google OAuth Client ID and Client Secret in the API Keys section (the page shows the exact redirect URI to register in Google Cloud Console).
- Click Connect on either Google Analytics or Search Console — one connection covers both.
- Approve access on Google’s screen. You’re redirected back here automatically, now connected.
Connecting Facebook
- Enter your Facebook App ID and Secret in the same API Keys section.
- Click Connect next to Facebook and approve access.
Where you connect your AI provider and turn individual features on or off.
Illustration — AI provider setup at the top, feature toggles below.
Key settings
- AI Provider & API Key — choose OpenAI, Claude, or Gemini, with a live link to get a key for whichever you pick
- Auto-optimize new content — automatically runs safe fixes (meta and schema) the moment you publish something new
- Feature toggles — turn Schema Generator, FAQ Generator, Internal Linking, AI Chatbot, and other features on or off individually
- White Label — replace “Rudwexa AI” branding with your own agency name throughout the admin
Rudwexa AI Visibility is free to use, with core features (Scanner, Content Optimizer, Schema, FAQ, Internal Links, Image AI) available on every install. Pro unlocks AI Writer, Prompt Tracking, Competitor Analysis, the Chatbot Builder, Business Automation, and Reports — for a one-time payment, not a subscription.
- Go to Rudwexa AI → License.
- If you don’t have a key yet, click Get Pro — this takes you to checkout, and your license key is shown on the confirmation page and emailed to you right after purchase.
- Paste the key into the Activate License box and click Activate.
- Pro features unlock immediately — no site reload needed.
If you run a WooCommerce store, Rudwexa adds AI tools directly to your product edit screen, in addition to everything else in this guide.
On every product’s edit screen
Look for the “Rudwexa AI” box in the sidebar — it has four buttons:
- Generate Description — writes the product description directly
- Generate FAQ — a product-specific FAQ, separate from your regular post FAQs
- Generate Schema — builds real Product schema using your actual WooCommerce data: price, stock, SKU, and reviews
- Generate Review Summary — once a product has at least 3 approved reviews, summarizes them into a short pros/cons overview, shown automatically above the reviews on that product’s page
Automatic on every product page
- “AI Recommended For You” — a related-products block that appears automatically, no setup needed
“Failed to save settings” or a fix shows no result
Check Settings first — most generation features (Schema, FAQ, AI Summary, expanded content) need an AI provider API key. The Scanner and Settings pages both show a short checklist if something’s missing.
Scores aren’t changing after a fix
Re-run a scan from the AI Scanner page — scores update based on the latest scan, not live as you make changes elsewhere.
A feature seems disabled or missing
Check Settings → Features — individual tools can be turned off there. If a feature shows a Pro badge, it needs an activated license (see Section 16).
Still stuck?
Check the specific error message shown — this plugin is built to explain exactly what went wrong rather than a generic failure, so the message itself is usually the fastest way to the fix.